|
|||||||||||||||||
|
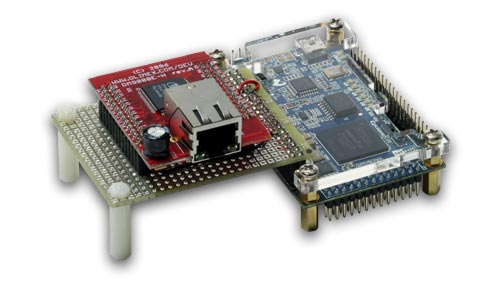
Nut/OS is a modular, open source, real time operating system for embedded platforms. It is easily configurable and optimized to run on 8 and 32 bit microcontrollers. The well documented software is an Open Source implementation of a Real Time Operating System called Nut/OS and a TCP/IP protocol suite named Nut/Net. Several application examples are provided, including an embedded Webserver, a simple RS232 to TCP/IP gateway and an Internet Radio playing MP3 streams. For more information take a look at the Ethernut project. Unfortunately the Nios II is not supported. Therefore I will describe in this tutorial how to support the Nios II soft processor. At the end of this session you will find the final projects for the DE0-Nano and DE1 board. Like in the session before I do not want to write every time "Quartus II", "Nios II" or "Altera DE0-Nano Development and Education Board" in this tutorial. Therefore I will use the short form "Quartus", "Nios" and "DE0-Nano". Here I will use the Altera DE0-Nano board and a self-made adapter.
The self-made adapter is equipped with a DM9000E-H board and is used for the ethernet connection. Because of a missing RS232 interface a FTDI USB TTL Serial Cable, here the TTL-232R-3V3 is used. Note: A 3V3 TTL-232 cable must be used. A 5V cable will destroy the FPGA! For the RS232 interface, the following connections must be made:
For more information about the connections to the DE0-Nano board, please take a look in the "de0_nano_system.qsf" file from session 1. We will not create the FPGA from the beginning, this was described in session 1 before. I will provide you a final version of the FPGA for the tutorial which we will build here. First of all you must create a tutorial folder. During the tutorial I will use "c:\nios_nutos_tut". Please create the folder also. Copy the nios_nutos_tut_1.zip file and save it inside the "c:\nios_nutos_tut" folder. Extract the ZIP file, the content of your folder should now look like:
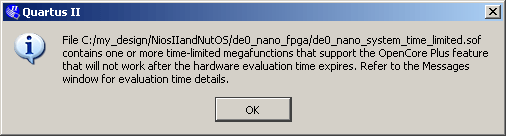
The ZIP file can be deleted. The new folder "de0_nano_fpga" contains the FPGA design for the DE0-Nano. Now we will start to build the design, therefore start Quartus. Use "File > Open Project..." and navigate to "c:\nios_nutos_tut\de0_nano_fpga". Here open the "de0_nano_system.qpf" file. This is the Quartus project file. Next use "Tools > Qsys", navigate to "c:\nios_nutos_tut\de0_nano_fpga" too. Here open the "system.qsys". After a while, close the "Open System Compleded" dialog. We can now create our system, therefore change to the "Generation" tab and click the "Generate" button. Now Qsys will generate the system. This can take a moment. At the end you should see the info: "Generate Complete. 0 Errors, 8 Warnings". The warnings are internal warnings, and we can ignore these special warnings here. Click "Close" to close the dialog. Use "File > Exit" to close Qsys and return to the Quartus window. In Quartus use "Processing > Start Compilation" to compile the design. This will start the compilation process which can take a while. At the end of the process a dialog box should appear which give you the information about a successful compilation. There should be no "Critical Warning" available. The SOF file was created and we can program the FPGA in the next section. Here we will repeat the last section from the session before and program the FPGA. I assumed that you have connect the DE0-Nano board with your computer and the USB-Blaster driver is still installed. For programming the FPGA select "Tools > Programmer". Because of the absent Nios license I got a message about the OpenCore Plus feature:
Press "OK", and the programmer window will be opened:
(Click inside the picture to expand) Everythink looks ok here. Click the "Start" button to program the FPGA. If you have problems to program the FPGA, press the "Start" button again. If the LED7 is blinking and the "Progress" indicator looks like:
Then programming the FPGA was successful. Now we can start the Nios II Software Build Tools for Eclipse. Nios II Software Build Tool (SBT) To start the Software Build Tools (SBT) click on the shortcut which was created during the Quartus installation:
While starting Eclipse you should see the following spash screen:
After a while Eclipse want to know where to store the workspace. Here I have installed the altera software under "D:\altera", therefore I will use "D:\altera\workspace" for the workspace:
Enter your directory and press "OK". Now the following "Welcome" window will appear:
(Click inside the picture to expand) To get more space, close the "Welcome" tab, the window should now look like:
(Click inside the picture to expand) Before we can start with the application, a Board Support Package (BSP) is needed. The BSP will created in the next section. To creating a new BSP use "File > New > Nios II Board Support Package". A new dialog will be opened. For the "Project name:" type "de0_nano_bsp". Browse to the SOPC information file which is stored under: "c:\nios_nutos_tut\de0_nano_fpga", select the "system.sopcinfo" file. It will takes some seconds... Remove the check mark for "Use the default location" and change it too: "C:\nios_nutos_tut\software\de0_nano_bsp" Select "Altera HAL" for the "BSP type" and "default" for the "BSP type version:". The dialog should now look like:
Press "Finish". After some seconds, the BSP was created and the Eclipse window should look like:
(Click inside the picture to expand) Let us take a look in the "Projekt Explorer", here the new BSP was created. If you expand the "de0_nano_bsp" folder by clicking on the "+" sign, you will see all the files which was created by the SBT.
Even there are some status information available in the "Console" tab. The BSP was now created, and we can start to configure it in the next step. To configure the BSP project, select the "de0_nano_bsp" in the "Project Explorer" and use "Project > Properties":
This will open a new window, which should look like:
(Click inside the picture to expand) Remove the check mark from "Support C++" and press the "Apply" button. It takes a while to apply the settings. Now press the "BSP Editor..." button. The Nios II BSP Editor will be opened:
(Click inside the picture to expand) There exist a lot of options which can be changed. For more detailed information, please take a look in the Altera documentation. Here I will explain only a small subset which we are using. Under "Settings > Common > hal" you will find the setting for the UART. Be sure that "uart_0" is selected for stderr, stdin and stdout. And "sys_clk_timer" for the "sys_clk_timer":
Press the "Generate" button. To leave the Editor, press the "Exit" button. If you have forgotten to generate a new BSP, you will be asked before leaving:
Press "Yes, Save" if you have changed something, and you want to use this new configuration. Now the BSP Editor is closed and the focus is set back to the properties of "de0_nano_bsp". Press the "OK" button to close the properties dialog. Hint: You get the option to generate a new BSP or open the "BSP Editor..." by right click on the "de0_nano_bsp" project and selecting "Nios II":
(Click inside the picture to expand) If you have changed anything from your FPGA design (session 1), make sure you generate a new BSP too. Select the "de0_nano_bsp" in the "Project Explorer" and use "Project > Build Project". A new dialog will be open which shows the build process. The BSP should be build without any "Problems". Now we will create the NutOS library which will be used later by the application. To create the library use "File > New > Nios II Library". A new dialog will be opened. For the "Project name:" type "nutos_v4103_de0_nano". Check mark the "Make library depend on a BSP", use "Browse Project List..." and select the "de0_nano_bsp". Check mark the "Use default location". The dialog should now look like:
For the "Project name:" we have use "nutos_v4103_de0_nano" because a library based on
(Click inside the picture to expand) In the next step we will fill the library project with the source. If you take a look at: "C:\nios_nutos_tut\software\nutos_v4103_de0_nano" The folder contains only some files from eclipse:
Copy the nios_nutos_tut_2.zip file and save it inside the "nutos_v4103_de0_nano" folder. Extract the ZIP file, the content of your folder should now look like:
The ZIP file can be deleted. The "nut" folder contains the Nut/OS library source now. Back to Eclipse. Right click on the "nutos_v4103_de0_nano" project and selecting "Refresh":
(Click inside the picture to expand) After a while the project contains the "nut" folder too:
It looks that the Eclipse GUI has a bug if you want to add some include folders in the library project. Therefore we must change the "Makefile" of the library project manually. But before you must refresh it again. Right click on the "Makefile" from the "nutos_v4103_de0_nano" project and select "Refresh" again. Now double click on the "Makefile" to open. Search "LIB_INCLUDE_DIRS" (near line 377) and add the "nut/cfg_include" and "nut/include" folders. It must look like:
Next we must change the include order. "LIB_INCLUDE_DIRS" must be used before "ALT_INCLUDE_DIRS". Search for "LIB_INCLUDE_DIRS" (near line 427) and move it in front of "ALT_INCLUDE_DIRS". It must now look like:
The "Makefile" can now be saved and closed. For the next changes we will use the GUI. Select the "nutos_v4103_de0_nano" in the "Project Explorer" and use "Project > Properties". A new window will be open. Expand "C/C++ General" and select "Paths and Symbols". Here change to the "Symbols" tab. The window will look like:
(Click inside the picture to expand) We will now add two symbols for the Indexer of Eclipse. This is not important, but makes the source easier to read later with Eclipse. The new symbols are "__NIOS2__" (use two underlines before and after NIOS2) and "ALTERA_DE0_NANO". "__NIOS2__" is defined by the compiler, but has no effects for the Indexer. Therefore it must be defined manually. "ALTERA_DE0_NANO" must be defined becasue we will use a DE0-Nano board. Press the "Add..." button, type "__NIOS2__" for the "Name:" and select both check marks, "Add to all configurations" and "Add to all languages":
Press "OK" to close the dialog. And the same for "ALTERA_DE0_NANO":
Press "OK" also. The "Symbols" tab should look like:
Now select "Nios II Library Properties" and type "-DALTERA_DE0_NANO" for "Defined symbols:". The window should look like:
(Click inside the picture to expand) Press the "OK" button to close the window. You will be asked by the system if the index should be rebuild:
Press the "Yes" button here. OK, we are ready to build the library. Select the "nutos_v4103_de0_nano" in the "Project Explorer" and use "Project > Build Project". A new dialog will be open which shows the build process:
The library should be build without any "Problems". Now we can start to build the application in the next section. Let's start with the application. Use "File > New > Nios II Application and BSP from Template". A new dialog will be opened. Important: Select here "Blank Project" first. Browse to the SOPC information file, the file should be stored under: "C:\nios_nutos_tut\de0_nano_fpga" Select the "system.sopcinfo" file. Use "httpd_simple_de0_nano" for the "Project name:". Remove the check mark from the "Use default location" and change it to: "C:\nios_nutos_tut\software\httpd_simple_de0_nano" The dialog should look like:
(Click inside the picture to expand) Press "Next >". Now you must select the BSP which was created before. Enable the option "Select an existing BSP project from your workspace". And select "de0_nano_bsp". The dialog should now look like:
(Click inside the picture to expand) Press the "Finish" button to close the dialog. Now it takes some seconds and an empty project (httpd_simple_de0_nano) was created by the SBT. The "Project Explorer" should look like:
In the next step we will add the source to the project. If you take at: "C:\nios_nutos_tut\software\httpd_simple_de0_nano" The folder contains only some files from Eclipse:
Copy the nios_nutos_tut_3.zip file and save it inside the "httpd_simple_de0_nano" folder. Extract the ZIP file, the content of your folder should now look like:
The ZIP file can be delete. The "src" folder contains now the source for the application. Back to Eclipse. Right click on the "httpd_simple_de0_nano" project ans select "Refresh". After a while the project contains the "src" folder too:
Here we must change the "Makefile" too. Right click on the "Makefile" from the "httpd_simple_de0_nano" project and select "Refresh" again. Now double click on the "Makefile" to open. Search "APP_INCLUDE_DIRS" (near line 294). Next we must change the include order. "APP_INCLUDE_DIRS" must be used before "ALT_INCLUDE_DIRS". Move "APP_INCLUDE_DIRS" in front of "ALT_INCLUDE_DIRS". It must now look like:
The "Makefile" can now be saved and closed. For the next changes we will use the GUI. Select the "httpd_simple_de0_nano" in the "Project Explorer" and use "Project > Properties". A new window will be open. Expand "C/C++ General" and select "Paths and Symbols". Here change to the "Symbols" tab. The window will look like:
(Click inside the picture to expand) Like before in the "Library Project" we will now add two symbols for the Indexer of Eclipse. This is not important, but makes the source easier to read later with Eclipse. The new symbols are "__NIOS2__" (use two underlines before and after NIOS2) and "ALTERA_DE0_NANO". Select both check marks, "Add to all configurations" and "Add to all languages". The "Symbols" tab should now look like:
Now select "Nios II Application Properties" and type "-DALTERA_DE0_NANO" for "Defined symbols:". The window should look like:
(Click inside the picture to expand) Be sure that the "Configuration" is set to "default [ active ]". Press the "OK" button to close the window. You will be asked by the system if the index should be rebuild. Press the "Yes" button here. Note: It looks that the GUI here has a bug too. Therefore, we have closed the properties window, although we need it again. In the next step the library and include info will be set. Select the "httpd_simple_de0_nano" in the "Project Explorer" and use "Project > Properties". It is important that the "Configuration" is not empty and is set to "default [ active ]". Expand the "Nios II Application Properties" and select "Nios II Application Paths". The window will look like:
(Click inside the picture to expand) Now we will add the "nutos_v4103_de0_nano" library to the project. Therefore use the "Add..." button in the "Library projects:" section. Select the "nutos_v4103_de0_nano" folder and press "OK". You will asked if the path should be converted to a relative path, press "Yes". Next two include paths from the library must be added. Use the "Add..." button in the "Application include directories:" section. Navigate to the "nutos_v4103_de0_nano\nut\cfg_include" folder and press "OK". Here we will use relative paths too. Use the "Yes" button. Use "Add..." again and navigate to the: "nutos_v4103_de0_nano_\nut\include" folder. Press "OK", and "Yes" for the relative paths. It is very important here that "cfg_include" is in front of "include". The window should look like:
(Click inside the picture to expand) Cross the fingers, mostly the settings will not accepted if you use the wrong way. If you press "OK" to close the window, and it takes a while, the settings are accepted. If the window closes immediately, the settings are not accepted :o( Press the "OK" button to close the window. The application can bebuild now. Right click on "httpd_simple_de0_nano" and use "Build Project":
This will start the build process of the application, the window will look like:
(Click inside the picture to expand) At the end of the build process, the "Project Explorer" will look like:
Hint: In case you have changed the BSP configuration, but do not generate a new BSP itself you will get an error. Take a look in the Console tab. You must first generate the BSP again. Start the build process of the application, the BSP and application will be build, hopefully without any error. Now it is time for a break. When you get back, we will start to debug the application. To start the debugger, right click on the "httpd_simple_de0_nano" project and use "Debug As > Nios II Hardware":
(Click inside the picture to expand) This will start the debugger, and after a while it is possible that you will see the following message box:
Press "Yes" and you will switch to the debug perspective. If you enable the checkmark "Rember my decision", the switch will be done automatically next time. The debug perspective will look like:
(Click inside the picture to expand) You can step through the code with the following button (in the Debug window):
But we want to run the program, use the "Resume" button:
After pressing the "Resume" button, the program is running. You can "Terminate and Remove" your debug task with the "Terminate" button:
Under rare conditions, it could be possible that the debugger will not start. In this case the "Debug Configurations" will be started (or you must start it manually):
(Click inside the picture to expand) Select the "Target Connections" tab, it should look like:
(Click inside the picture to expand) In case the "Cable" does not show "USB-Blaster on localhost [USB-0]", press the "Refresh Connections" button (sometimes twice or more). If you can see the correct Cable information, press the "System ID Properties..." button. The message box should look like:
Here it is important that the "Expected system ID" and the "Conencted system ID" are equal. Even the "Expected system timestamp" and "Connected system timestamp" must be equal. If not, close the message box and press the "System ID Properties..." button again. If everything is OK, the debugger can be start by pressing the "Debug" button in the "Debug Configurations" windows. In the next session I will show you how to import existing projects into your workspace. The ZIP file does not contain a full Nut/OS version. For an original version of Nut/OS and the license information take a look at the following page. The ZIP file contains a FPGA design, a Nut/OS library and some applications. You can compile the design and build the library and applications like described in this tutorial. Take a look in the next session where I will show how to import a Nut/OS package into your workspace.
|
|||||||||||||||||